Introduction:
SonarQube is an open-source platform used to perform continuous review and verification of code quality to detect bugs, vulnerabilities and code smells in the application.
In this tutorial, we’ll see how to install and configure it for a project. All the codes and configuration are on Github. Source: SonarSource.
Prerequisite:
- Java 17
- PostgreSQL
- Jenkins
View this tutorial below to install and setup Jenkins.
Setup Database:
First login to PostgreSQL and create a user named sonaruser or any other name with password as shown below.
Create a database named sonarqubedb with sonaruser as the owner. Grant all the privileges on the sonarqubedb database to the sonaruser. And exit postgress and the postgress user.
sudo su - postgres

postgres@labputer:~$ psql
psql (14.7 (Ubuntu 14.7-0ubuntu0.22.10.1))
Type "help" for help.

postgres=# CREATE USER sonaruser WITH PASSWORD 'sonarpwd';
CREATE ROLE

postgres=# CREATE DATABASE sonarqubedb;
CREATE DATABASE

postgres=# GRANT ALL PRIVILEGES ON DATABASE sonarqubedb to sonaruser;
GRANT

postgres=# exit
postgres@labputer:~$ exit
logout
Now download the sonarqube archive from the official site and extract it. Then move the files to /opt
sudo mv sonarqube /optWe need to edit the config file under /opt/sonarqube/conf/sonar.properties with the DB details before we start SonarQube.
At the Database section, uncomment the jdbc.username and jdbc.password lines with the username and password we created earlier.
On the PostgreSQL section uncomment the jdbc.url line as following. Save and exit.
$ vim /opt/sonarqube/conf/sonar.properties
-------------------------------------------

# DATABASE
sonar.jdbc.username=sonaruser
sonar.jdbc.password=sonarpwd

#----- PostgreSQL 11 or greater
sonar.jdbc.url=jdbc:postgresql://localhost:5432/sonarqubedb
At this point, we can start sonarqube by executing the shell script, but for convince and for auto starting the server, we’ll create and enable sonarqube service.
First create the systemd service file with the content as below. Save and quit.
$ sudo vim /etc/systemd/system/sonar.service[Unit]
Description=SonarQube service
After=syslog.target network.target
[Service]
Type=forking
ExecStart=/opt/sonarqube/bin/linux-x86-64/sonar.sh start
ExecStop=/opt/sonarqube/bin/linux-x86-64/sonar.sh stop
User=sagar
Group=sagar
Restart=always
LimitNOFILE=65536
LimitNPROC=4096
[Install]
WantedBy=multi-user.targetStart and Enable the service with the following commands:
$ sudo systemctl start sonar && sudo systemctl enable sonar

$ sudo systemctl status sonar
Now browse your IP with port 9000. We shall see the login page in few seconds.
The default username and password both are “admin”. After you login, you’ll prompted to change the password. Proceed further and we shall see project creation page.

SonarQube installation is complete.
Integration with Jenkins:
Before we proceed, lets understand the components
- SonarQube Server — Server which stores and displays all the information about project.
- SonarScanner — A standalone application, that runs analysis and sends to the SonarQube server.
So we need to configure both these in our Jenkins, to automatically scan the project and display the result.
Adding SonarScnnaer :
- Add SonarScanner plugin in Jenkins
Manage Jenkins → Manage Plugins → Available Plugins → Search “SonarScanner” → Select checkbox → Install (any of the two options below).
Now that we have the plugins, lets configure the version
Manage Jenkins → Global Tool Configuration.
- Provide a name, check Install automatically , select a version and save.

Configuring SonarQube Server in Jenkins:
First generate a token in SonarQube administarive section:

Add the generated token to Jenkins credentials with any ID.
Manage Jenkins → Credentials → System →Global credentials (unrestricted) → Add Credentials .
Select Secret Text from the drop down, paste in the token, assign an ID and save.
We need to tell Jenkins where the SonarQube server is
Manage Jenkins → Configure System → SonarQube Servers → Check Environment Variables.
Provide name, sonarqube sever host url and select the credential created earlier and save.

Running Analysis:
You can create projects by connecting to any of the repository platforms by connecting to them. In this way you will see all your repositories to be available to SonarQube.
Or you can just create it manually. (Follow the guide on the setup page)
- Provide Project name and key.
- Select Jenkins as integration platform, and Project type to get code snippet
- Use that code snippet in Jenkins file.
However, I m going to do a separate way. I have defined everything in my project. Now I just need to configure all the details in Jenkinsfile.
Here I m using a Gradle project (credits : SonarSource github). Project name and key are defined under the build.gradle file.

In Jenksins file I just need to run the gradlew sonar command with the somarqube login details.
We will use a token for login. We can create a new token and it to the credentials store or use the previous one. As we have the credentials stored, we’ll use environmental variable to call the token and pass it to the gradle sonar command.
Jenkins Pipeline Job:
Configure jenkins job for auto project analysis. Follow the article below on jenkins job setup.

After the the job is built, go to SoarQube server and we should see our project is created and all the details are being displayed.

Click on Issues to view more details on where the issues are how to fix them
Quality Gate Setup:
Quality gate is a set of conditions based on which the you decide whether the code is ready to be published. The Projects overall status can also change based on what you define. For example you set the code coverage to be min 75%, or duplicate lines not to be more than 50. By default the Sonar Way quality gate is applied.
Lest setup one with few of our own condition.
Select Quality Gate and click create button. Name it and Save.

Now click on “Unlock Editing” at the end of the page and then “Add Condition” button. Select if you want to apply the condition on new code or the whole application code. Select a condition from the drop down, provide a value and save.

Scroll to the project section and select on which project you want to apply this quality gate.

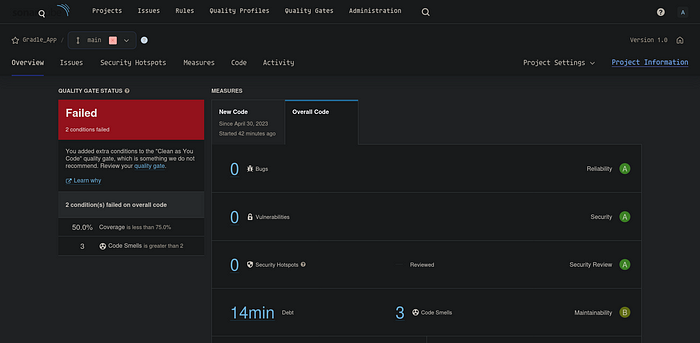
Now rebuild the jenkins job and we shall see the project status as “failed” in sonarqube as opposed to the previous status.

Now click on the project to see why this failed. As we can see the code coverage is 50% < our condition of 75% . Similarly code smell count is 3 > our set condition of 2.

Sending Quality Gate Status to Jenkins:
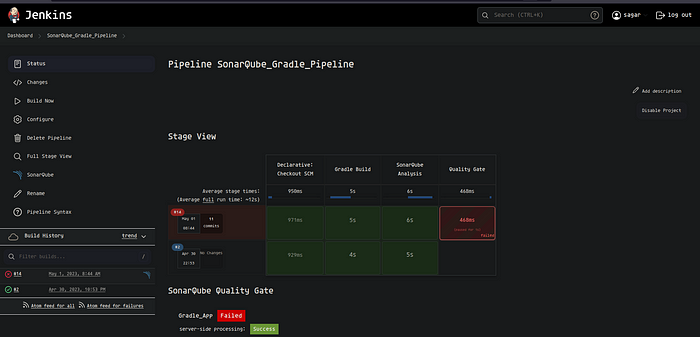
If we look at our jenkins job status, we see its successful since there was no error. But as our code is not ready to be published yet. We may want to mark the job status based on our quality gate status.
For this, we need to setup a webhook to send the result back to Jenkins.
Click on Administration tab, select Webhook from the drop down and click on create button. Name it, provide jenkins url/sonarqube-webhook. Save.

Note: SonarQube does not allow webhook on localhost (loopback address) by default. If you want to use localhost, disable the validation as shown below:

Now, we need to modify the Jenkinsfile to receive the quality gate webhook.
pipeline {
    agent any
    stages {

        stage('Gradle Build') {
            steps {
                sh 'chmod +x gradlew'
                sh "./gradlew build"
            }
        }

        stage('SonarQube Analysis') {
            steps {
                withSonarQubeEnv(installationName: 'SQ_Server'){

                sh 'chmod +x gradlew'
                sh "./gradlew sonar"
                //-Dsonar.token=$SONAR_LOGIN"
               }

           }
        }

        stage('Quality Gate') {
            steps {
                timeout(time: 10, unit: 'MINUTES')
                {
                    waitForQualityGate abortPipeline: true
                }
           }

        }
    }
}
Rebuild the job. Once the job is complete, we should see it fail because of quality gate.


That’s all about it. Hope you found it useful.
Reference: SonarQube Docs, Vultur, TecMint
More on Jenkins : Install and Setup Job.
